Uh oh, you are visiting the site using Internet Explorer. Which is an outdated browser.
For the best experience please visit the site using one of the following browsers.
ChromeSafariFirefox
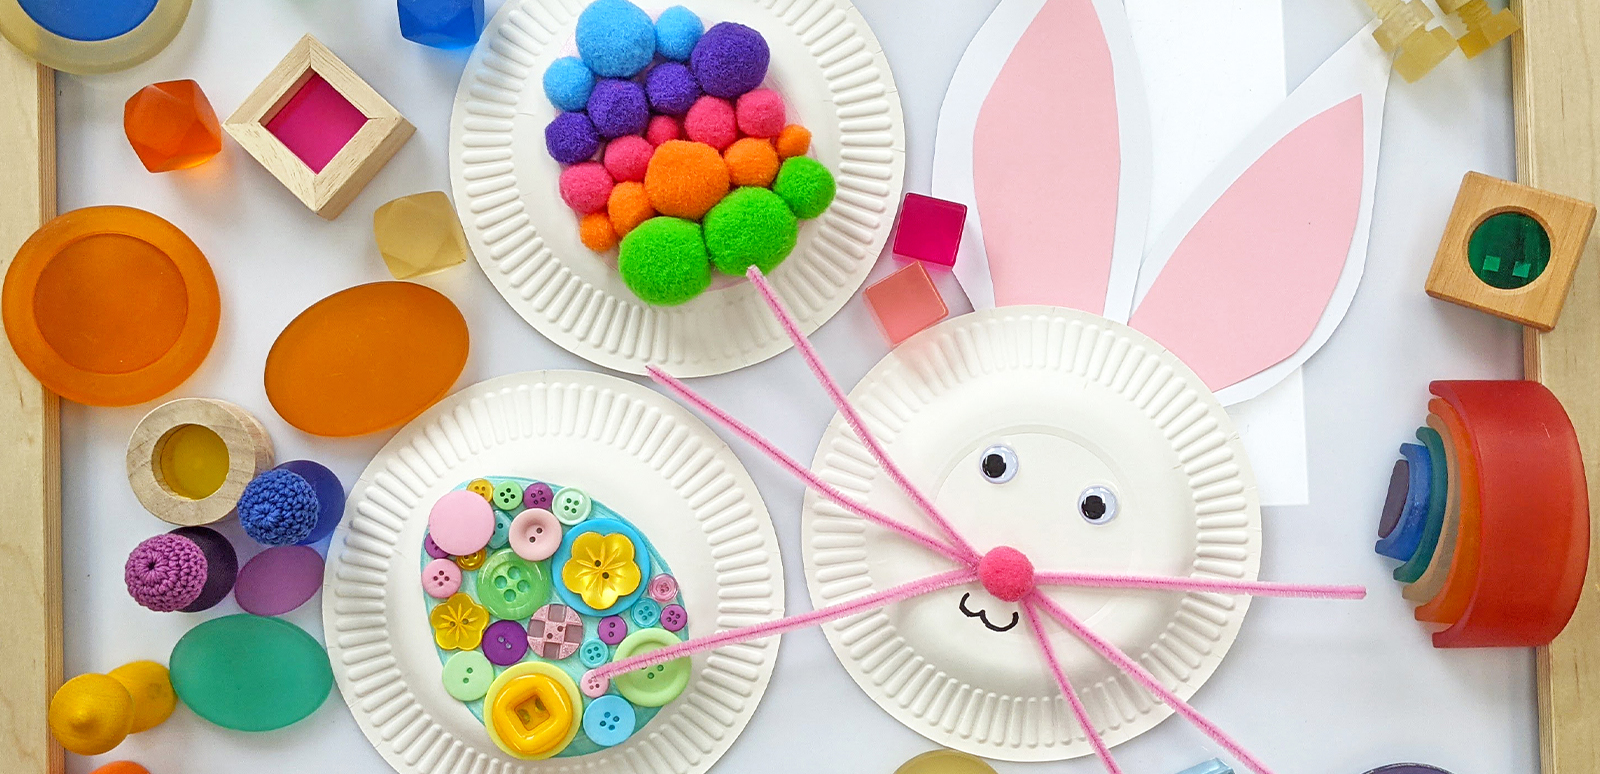
Profile: Paper plates are a great template to make the perfect Easter craft that children will enjoy because they’re so easy and the design options are endless!
Written by: Bellbird
What you will need:
- Large Paper Plates
- Acrylic Paint
- Recycled A4 Construction Paper 100gsm
- Round Joggle Glue On Eyes
- Assorted Colour Pipe Cleaners
- Pastel Colour Buttons
Easter Craft
Paper plates make the perfect Easter craft that children can enjoy because they’re so easy and the design options are endless!
Step 1.
Draw or paint an egg shape onto the bottom of the plate. This will be your guide.
Step 2.
Pick and choose your favourite buttons to place on the egg shape. You can also create these egg shapes with pom poms so the design is up to you! It’s best to arrange them before getting the glue out.
Step 3.
Once you’re happy with the design, use some PVA glue and glue the buttons or pom poms individually to the plate.
Step 4.
Wait for the glue to dry - then you’re done!
2644 Paper plates are a great template to make the perfect Easter craft that children will enjoy because they’re so easy and the design options are endless! Easter Craft 2644 Easter Craft Paper plates are a great template to make the perfect Easter craft that children will enjoy because they’re so easy and the design options are endless! 2644 3 3
What you will need:
- Large Paper Plates
- Acrylic Paint
- Recycled A4 Construction Paper 100gsm
- Round Joggle Glue On Eyes
- Assorted Colour Pipe Cleaners
- Pastel Colour Buttons
Easter Craft
Paper plates make the perfect Easter craft that children can enjoy because they’re so easy and the design options are endless!
Step 1.
Draw or paint an egg shape onto the bottom of the plate. This will be your guide.
Step 2.
Pick and choose your favourite buttons to place on the egg shape. You can also create these egg shapes with pom poms so the design is up to you! It’s best to arrange them before getting the glue out.
Step 3.
Once you’re happy with the design, use some PVA glue and glue the buttons or pom poms individually to the plate.
Step 4.
Wait for the glue to dry - then you’re done!
Inspiring Tutorials Easter Craft Easter Craft
What you will need:
- Large Paper Plates
- Acrylic Paint
- Recycled A4 Construction Paper 100gsm
- Round Joggle Glue On Eyes
- Assorted Colour Pipe Cleaners
- Pastel Colour Buttons
y Bellbird n
What you will need:
- Large Paper Plates
- Acrylic Paint
- Recycled A4 Construction Paper 100gsm
- Round Joggle Glue On Eyes
- Assorted Colour Pipe Cleaners
- Pastel Colour Buttons
Easter Craft
Paper plates make the perfect Easter craft that children can enjoy because they’re so easy and the design options are endless!
Step 1.
Draw or paint an egg shape onto the bottom of the plate. This will be your guide.
Step 2.
Pick and choose your favourite buttons to place on the egg shape. You can also create these egg shapes with pom poms so the design is up to you! It’s best to arrange them before getting the glue out.
Step 3.
Once you’re happy with the design, use some PVA glue and glue the buttons or pom poms individually to the plate.
Step 4.
Wait for the glue to dry - then you’re done!
Inspiring Tutorials Easter Craft 2644 2 Easter Craft Paper plates are a great template to make the perfect Easter craft that children will enjoy because they’re so easy and the design options are endless! Paper plates are a great template to make the perfect Easter craft that children will enjoy because they’re so easy and the design options are endless! blog 3 Blog Post 0000-00-00 00:00:00 2023-12-18 11:45:30
What you will need:
- Large Paper Plates
- Acrylic Paint
- Recycled A4 Construction Paper 100gsm
- Round Joggle Glue On Eyes
- Assorted Colour Pipe Cleaners
- Pastel Colour Buttons
Easter Craft
Paper plates make the perfect Easter craft that children can enjoy because they’re so easy and the design options are endless!
Step 1.
Draw or paint an egg shape onto the bottom of the plate. This will be your guide.
Step 2.
Pick and choose your favourite buttons to place on the egg shape. You can also create these egg shapes with pom poms so the design is up to you! It’s best to arrange them before getting the glue out.
Step 3.
Once you’re happy with the design, use some PVA glue and glue the buttons or pom poms individually to the plate.
Step 4.
Wait for the glue to dry - then you’re done!
0 2644 Easter Craft
What you will need:
- Large Paper Plates
- Acrylic Paint
- Recycled A4 Construction Paper 100gsm
- Round Joggle Glue On Eyes
- Assorted Colour Pipe Cleaners
- Pastel Colour Buttons
Bellbird Easter Craft 2644 Paper plates are a great template to make the perfect Easter craft that children will enjoy because they’re so easy and the design options are endless! 271 271 271 0 0 Paper plates are a great template to make the perfect Easter craft that children will enjoy because they’re so easy and the design options are endless! 190 Paper plates are a great template to make the perfect Easter craft that children will enjoy because they’re so easy and the design options are endless! blog_stories /assets/webshop/cms/44/2644.png?1614572405(CODE) (CODE) (CODE) 0 2023-12-18 11:45:30 Easter Craft https://www.bellbirdkidz.com.au/blog/inspiring-tutorials/easter-craft/ 1 69b011cb9b80811ea9a99abec99db53d production 0 1 1 Integration_Deprecated::AccLib OTHER {"trial":{"configs":{"main:L10N_DATETIME_FORMAT":"dd-mm-yyyy","main:L10N_DATETIME_ENABLED":1},"planSku":"TRIAL","licences":{"ALLOW_SAMPLE_DATA":1,"INITIAL_APP_ECOMMERCE":1,"LICENSE_APP_PROMOTION":1,"LICENSE_APP_USER_GROUPS":1,"USE_SUBSCRIPTION_SYSTEM":"EXTERNAL","LICENSE_APP_COMBINE_ORDER":1,"LICENSE_APP_MULTILEVEL_PRICING":1,"REQUIRED_FORM_BUSINESS_DETAILS":1},"trialExpiryDays":"14","showOnboardingForms":"merchant","allowSubscriptionChanges":"merchant","subscriptionChangesRedirectUrl":"https:\/\/www.netohq.com\/au\/contact","subscriptionChangesContactUsUrl":"https:\/\/www.netohq.com\/au\/contact"},"cpanelTemplates":{"netoBillingPortalLink":"Legacy Billing Portal"},"cpanelRestrictions":{"addons":{"blacklist":[5,156,157,157,158,161,163,164,165,166,167,168,169,170,171,172,236,240,243,251,253,254,255,256,256,257,257,258,259,260,261,262,283,303]}}} 2025-07-01 03:38:43 /_myacct 1 1 1 0 sales@neto.com.au marketing 15 ebay free asset 0 0 1 0 1 1 1 1 0 0 1 1 1 y 1 0 apptizer Apptizer 8 0 0 0 0 0 0 10 0 trent@bellbird.com.au 0 8 270256 8 8 1 1 1 0 0 https://www.bellbirdkidz.com.au/blog/inspiring-tutorials/easter-craft/ 1 5 C 0 0 1 0 1 0 1 0 1 1 left 1 0 0 required 0 0 0 1 1 1 Subscribe to our newsletter and we'll keep you up to date on our products and services. 1 0 /_mycart 0 0 0 52 006 761 495 46 Commercial Drive, Lynbrook VIC 3975 Dean's Pty Ltd t/as Bellbird Kid-Z Educational Resources 083 781 National Australia Bank 730100775 enquire@bellbird.com.au 03 9799 9533 Bellbird Early Educational Resources 1300 365 268 46 Commercial Drive, Lynbrook VIC 3975 cp 3 0 0 1 managed 1 /_cpanel Account Credit production 2644 1 0 2644 content /blog/inspiring-tutorials/easter-craft/ 0 sandbox 0 0 0 1 1 AU AUD sales 2022-bellbirdkids m category WS default AUSPOST 1 8 7 4 default 0 0 sortorder 1 8 popular gallery ea 1 Prepaid 0 Staging 0 1 cm m3 km m kg 0 system https://design.neto.com.au/assets/themerepos5-ebay/ 0 3 Integration::Ebay 1 bellbirdkidz.com.au www.bellbirdkidz.com.au 0 1 0 1 0 0 1 0 1 1 1 0 0 0 0 0 1 1 1 1 1 1 1 1 0 0 0 1 0 1 0 0 0 1 0 0 0 0 0 1 0 export https://www.facebook.com/bellbirdeducationalresources/ fax_logo.gif Feedback Request 1 1 FREE FREE FREE AIzaSyC3Pep87jmCbuirH_G2_Ftd0f5A08cUYpw 1.1 0 0 0 0 0 3 5.00 home www.bellbirdkidz.com.au 1 0 0 0 0 white 100x100 140x100 300x66 1600 1600 600 100 900x600 80x80 437 372 220 100 180 nntwmtk9
Oops!
INTERNAL ERROR''An internal error has occured. Please call technical support if you continue to get this message.